Haiz Finally i get to remove it = =ll
Friday 13 September 2013
Search Results How to fix Could not find this item Error when deleting files
Haiz Finally i get to remove it = =ll
Monday 1 July 2013
LG 4XHD P880 KDZ FILE FLASH
LG 4XHD P880 KDZ FILE FLASH
1 ) Download these 3 apps: http://www.4shared.com/rar/Re4VCOAS/kdz-udpate.htm (the original link is deleted, re-uploaded by RuedasLocas)
To get KDZ file you can find it here : http://lg-phone-firmware.com/index.php?id_mod=15
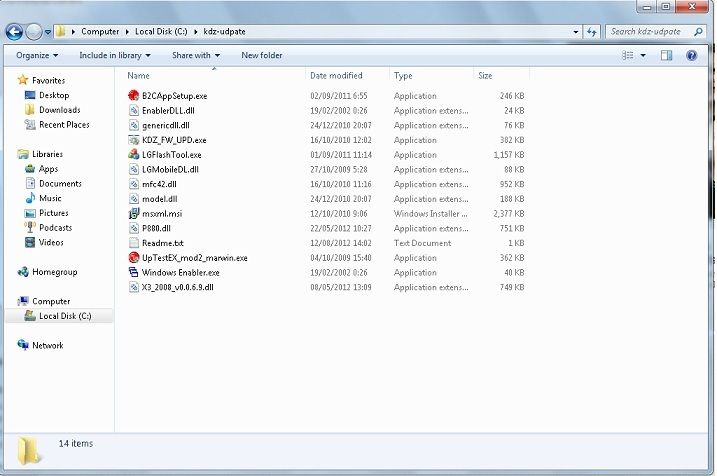
2 ) Once downloads complete Extract the file (ex.: C:\KDZ\) and u will get folder like this :-
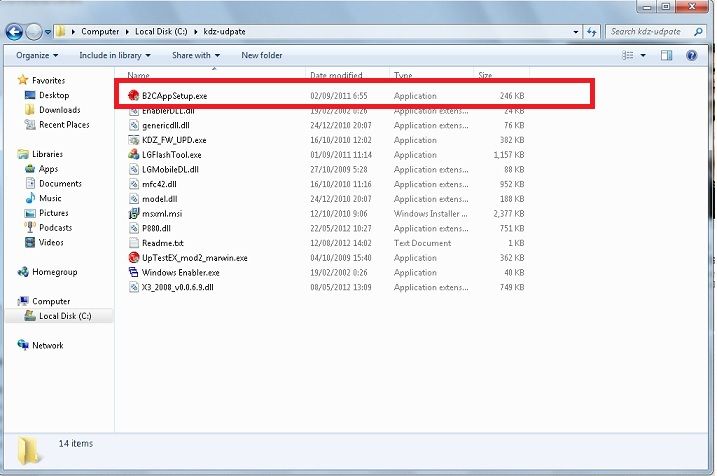
3) Install B2CTools LG ( B2CAppSetup.exe ) this file is located on the folder that yr extract before .
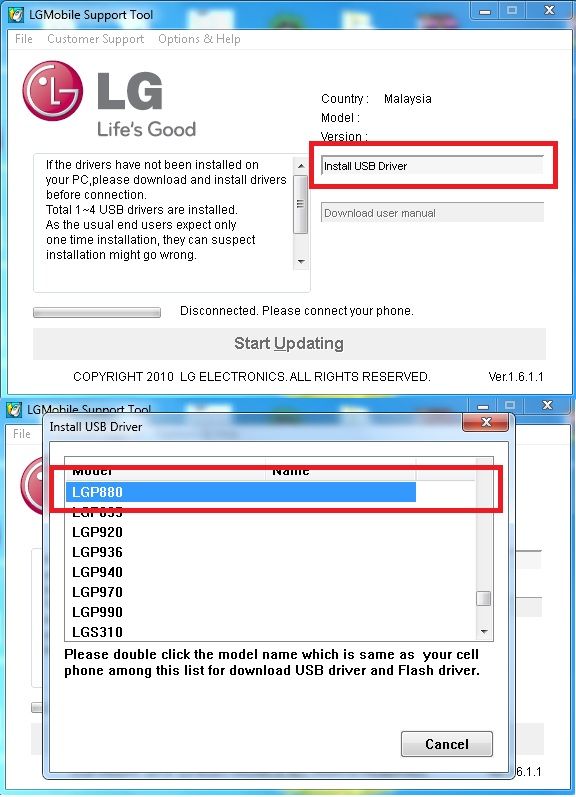
4) Run LGMobile update (must be on your desktop) and install the usb drivers .
5 ) Turn off yr device and remove the battery .
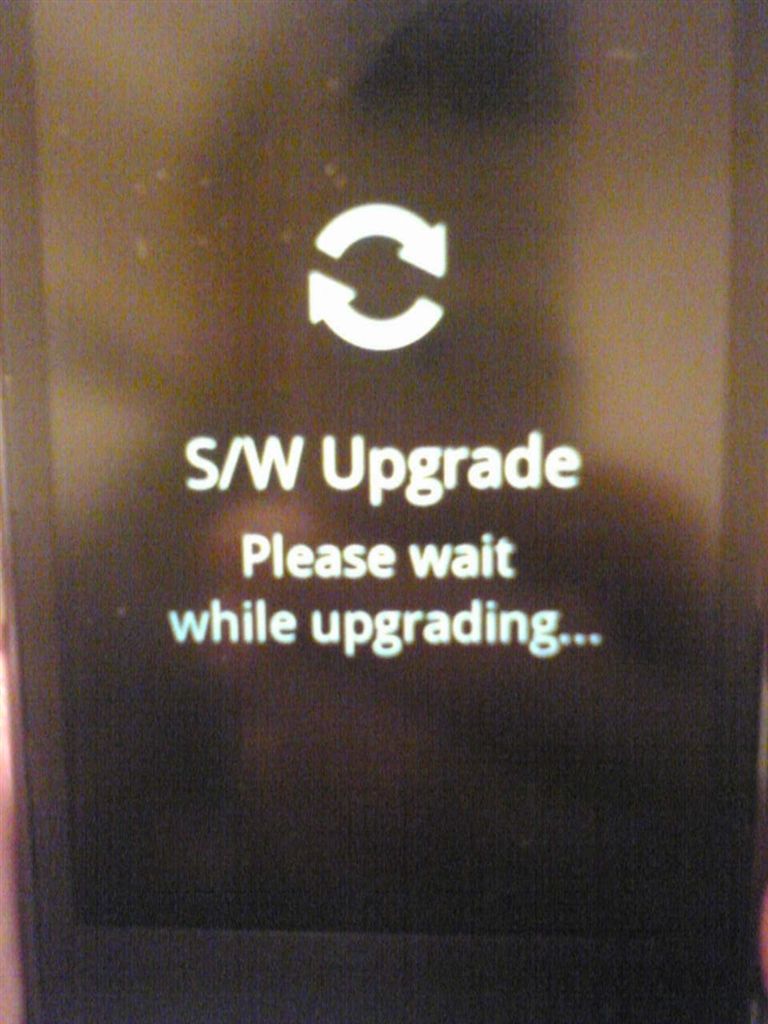
6 ) Now just hold down vol - key ( hold hold hold dont release !!!! ) and plug the USB cable until you get screen like this :-
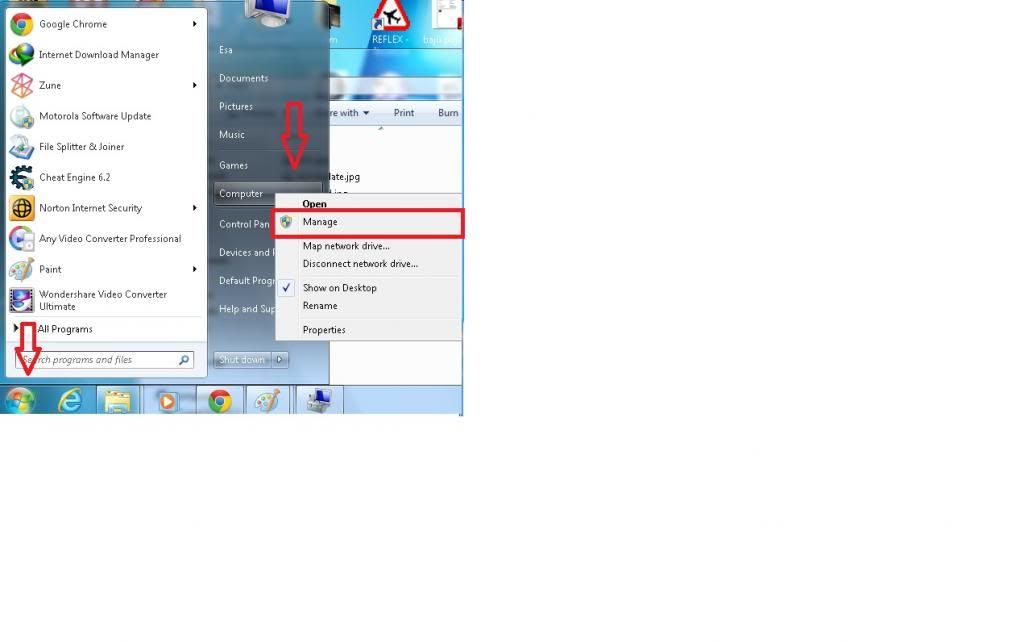
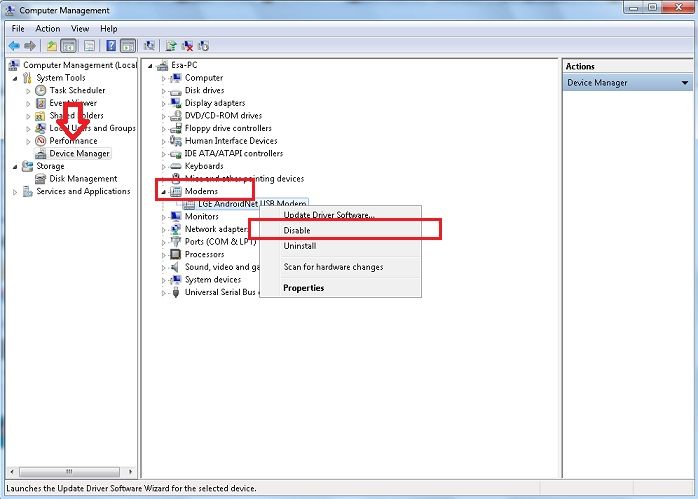
7 ) Wait for while due to yr computer will install some driver . Once the install is complete find "Device Manager" > Modems > disable the LGE Mobile USB Modem on yr computer ( me using win 7 -----> start ---> computer ---> right click / and you can find device manager )
8) Run as administrator KDZ_FW_UPD.exe ( file located at step no 2 )
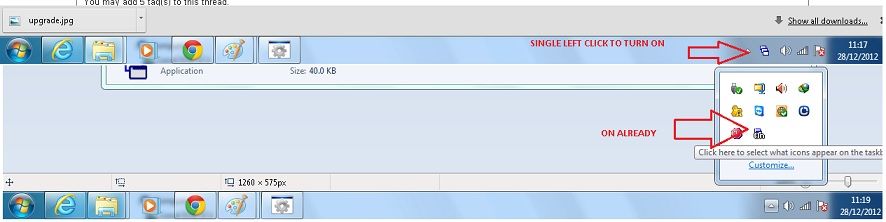
9) - Run as administrator Windows Enabler.exe ( file located at step no 2 ) . After run the app, an icon will appear on your tray, single-click on the icon util the "ON" text appears over the icon like this :-
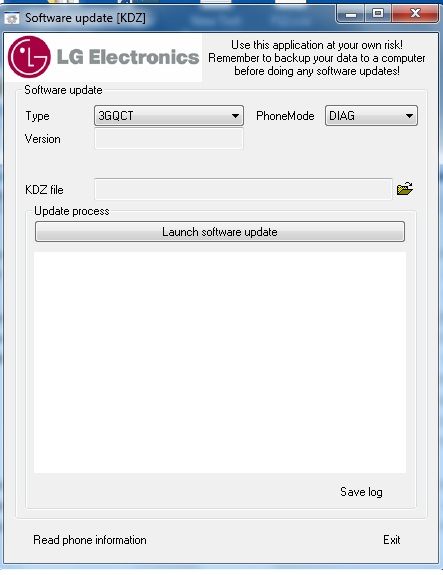
10 ) Go back to KDZ, locate press on the yellow folder and locate the .kdz file that you want to flash
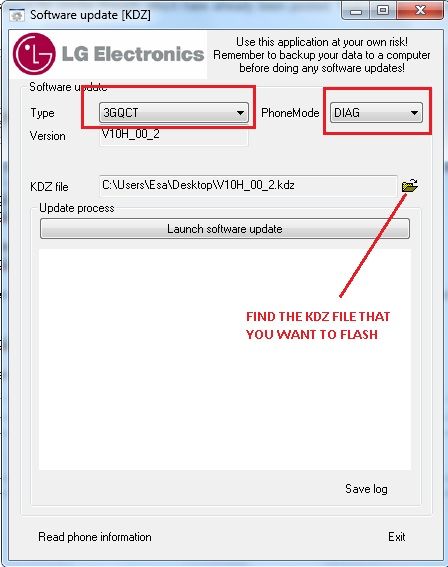
11) Click on "Launch Software Update"
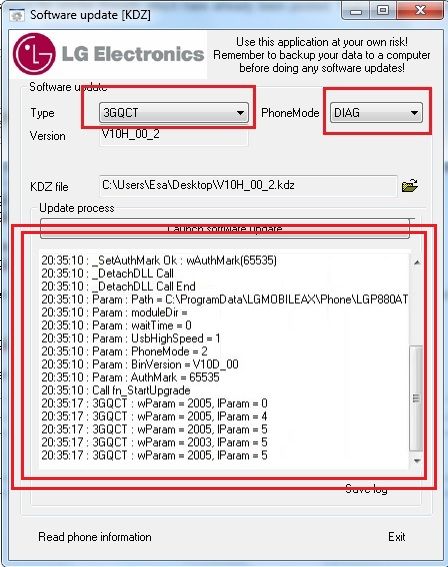
12 ) Please see below picture !! Very important !!!! Now standby to put yr battery back !!!!!!
When the log start to run, put the battery back on. ( thanks to RuedasLocas ) im copy from u
13 ) - WAIT until your phone reboots automatically and unplug the cable , ( ALL IS DONE ) please check yr firmware on yr phone ....
- Dont care about the errorlog, it's normal
If you got only bootloop after flash .kdz, just do a hard reset:
- press and hold [vol -] and [power] until you got the "android recovery figure" and wait until they reboot again.
INFO !
When you tried to update yr LG Optimus 4x HD , the error comes " Your Device Is Not Registered Yet "
That because you're using different version than the original country and you wont receive OTA update .
The only way to get it back is by using LG software or KDZ method and install yr country's firmware.
I hope this will help for those want to update firmware via KDS
And thanks to RuedasLocas because always help if we in trouble .. Thanks bro ..............
Before start flashing please do backup first ( yr photos , Videos , music on yr SD card )
For clean install wipe yr data / factory reset !!!
special thanks tutorial by :esag21
1 ) Download these 3 apps: http://www.4shared.com/rar/Re4VCOAS/kdz-udpate.htm (the original link is deleted, re-uploaded by RuedasLocas)
To get KDZ file you can find it here : http://lg-phone-firmware.com/index.php?id_mod=15
2 ) Once downloads complete Extract the file (ex.: C:\KDZ\) and u will get folder like this :-
3) Install B2CTools LG ( B2CAppSetup.exe ) this file is located on the folder that yr extract before .
4) Run LGMobile update (must be on your desktop) and install the usb drivers .
5 ) Turn off yr device and remove the battery .
6 ) Now just hold down vol - key ( hold hold hold dont release !!!! ) and plug the USB cable until you get screen like this :-
7 ) Wait for while due to yr computer will install some driver . Once the install is complete find "Device Manager" > Modems > disable the LGE Mobile USB Modem on yr computer ( me using win 7 -----> start ---> computer ---> right click / and you can find device manager )
8) Run as administrator KDZ_FW_UPD.exe ( file located at step no 2 )
9) - Run as administrator Windows Enabler.exe ( file located at step no 2 ) . After run the app, an icon will appear on your tray, single-click on the icon util the "ON" text appears over the icon like this :-
10 ) Go back to KDZ, locate press on the yellow folder and locate the .kdz file that you want to flash
11) Click on "Launch Software Update"
12 ) Please see below picture !! Very important !!!! Now standby to put yr battery back !!!!!!
When the log start to run, put the battery back on. ( thanks to RuedasLocas ) im copy from u
13 ) - WAIT until your phone reboots automatically and unplug the cable , ( ALL IS DONE ) please check yr firmware on yr phone ....
- Dont care about the errorlog, it's normal
If you got only bootloop after flash .kdz, just do a hard reset:
- press and hold [vol -] and [power] until you got the "android recovery figure" and wait until they reboot again.
INFO !
When you tried to update yr LG Optimus 4x HD , the error comes " Your Device Is Not Registered Yet "
That because you're using different version than the original country and you wont receive OTA update .
The only way to get it back is by using LG software or KDZ method and install yr country's firmware.
I hope this will help for those want to update firmware via KDS
And thanks to RuedasLocas because always help if we in trouble .. Thanks bro ..............
Before start flashing please do backup first ( yr photos , Videos , music on yr SD card )
For clean install wipe yr data / factory reset !!!
special thanks tutorial by :esag21
Tuesday 9 October 2012
ZTE BLADE FIRMWARE UPGRADE
 1.prepare 1 or 2gb micro SD card
2.download official android 2.3 firmware upgrade as image.bin file
3.format micro SD card with fat32
4.make sure you Zte Blade battery was not less then 50%
5.extract the image.rar file,you will see inside the file was having image folder just copy
the image folder with image.bin file to your root micro SD card.
6.install the micro SD card to your Zte Blade, off your devices then press and
hold(menu,volume+and power)button at same time.
7.your devices will show a bar at screen wait until the bar was run finish congratulation your devices
was success be upgrade from android 2.2 to android 2.3.
Monday 1 October 2012
Zte v9 Firmware upgrade
 Item needs
i.Sales_MultiDL_MSM7227_V1.00.01(PC flashing tools)
ii. V9_GENERICV1.0.0B03(official firmware part1)
iii.V9 GENERICV1.0.0B03 PART2
iv.visionaryplus.apk (for rooting/temporary root)
v:ZTE usb driver
Caution: This can only be done in the boot case!!! take your own risk will not responsibility if your tablet break. and i was success...with this devices
1.install Sales MultiDL MSM7227 V1.00.01 at your PC
2.download V9 GENERICV1.0.0B03 PART1 and PART2 official firmware v2.2
3.download visionaryplus.apk and install to ZTE V9 for temporary root , you will need
root for firmware upgrade , if not Sales MultiDL software will need you get license from ZTE
this way to skip for getting license.
4.Run Sales_MultiDL_MSM7227 v1.00.01 select V9 GENERICV1.0.0B03 like picture below.
 5.After install visionaryplus.apk run the apps after will reboot devices, remove and rinstall the battery press and hold power button and volume down button wait until your devices show FTM mode,plug the devices to pc. then you will see picture as below....

6.make sure (com port )show at your computer management was same with (V9 Flasher) com port, when success it will show (ready), click on (Start ALL) wait until show finish at beside ready bar.
7.After done remove out the battery and reinstall back battery restart the tablet congratulation you was success upgrade you tablet from android 2.1 to android 2.2.

i.Sales_MultiDL_MSM7227_V1.00.01(PC flashing tools)
ii. V9_GENERICV1.0.0B03(official firmware part1)
iii.V9 GENERICV1.0.0B03 PART2
iv.visionaryplus.apk (for rooting/temporary root)
v:ZTE usb driver
Caution: This can only be done in the boot case!!! take your own risk will not responsibility if your tablet break. and i was success...with this devices
1.install Sales MultiDL MSM7227 V1.00.01 at your PC
2.download V9 GENERICV1.0.0B03 PART1 and PART2 official firmware v2.2
3.download visionaryplus.apk and install to ZTE V9 for temporary root , you will need
root for firmware upgrade , if not Sales MultiDL software will need you get license from ZTE
this way to skip for getting license.
4.Run Sales_MultiDL_MSM7227 v1.00.01 select V9 GENERICV1.0.0B03 like picture below.


6.make sure (com port )show at your computer management was same with (V9 Flasher) com port, when success it will show (ready), click on (Start ALL) wait until show finish at beside ready bar.
7.After done remove out the battery and reinstall back battery restart the tablet congratulation you was success upgrade you tablet from android 2.1 to android 2.2.
Friday 14 September 2012
HTC RUNNYMEDE ROM S-OFF firmware upgrade 2.3.6 to ICS
1.adb devices (verify devices)
2.adb reboot bootloader (enter bootloader at android mode)
3.fastboot getvar cid (get to know your devices CID "carrier id")
4.SigTool rom.zip( Sign permission to extract the rom)
5.SigTool nullsign rom-new.zip(null sign repacking the rom)
6.fastboot flash zip rom-new.zip(flashing zip rom)
7.fastboot flash hboot hboot***.nb0 (flashing hboot)
8.fastboot reboot (reboot devices)
It's basically a patched Bootloader which pretends S-OFF (It's not Radio S-OFF.), you can be change back to official bootloader. , follow the way without passing htc dev to unlock bootloader.
Step is just work on firmware 2.3.6 to 4.0 ics only.
1.)Download (Runnymede Temporary Root), for temporary root your devices

Now second step pretends S-OFF

- Htc Runnymede Official ICS firmware
- Runnymede Temporary root
- FARDJADB (Runnymede S-OFF)
- Sigtool
- Htc Windows Driver
1.adb devices (verify devices)
2.adb reboot bootloader (enter bootloader at android mode)
3.fastboot getvar cid (get to know your devices CID "carrier id")
4.SigTool rom.zip( Sign permission to extract the rom)
5.SigTool nullsign rom-new.zip(null sign repacking the rom)
6.fastboot flash zip rom-new.zip(flashing zip rom)
7.fastboot flash hboot hboot***.nb0 (flashing hboot)
8.fastboot reboot (reboot devices)
It's basically a patched Bootloader which pretends S-OFF (It's not Radio S-OFF.), you can be change back to official bootloader. , follow the way without passing htc dev to unlock bootloader.
Step is just work on firmware 2.3.6 to 4.0 ics only.
1.)Download (Runnymede Temporary Root), for temporary root your devices
- install Htc Windows Driver to windows pc
- extract (Runnymede Temporary Root) should be this file (doomlord_v4_root-zergrush-busybox-su.zip) to your pc.
- Enable USB debugging on your device from Settings > Applications > Development
- Plug your device to your pc via the usb cable, make sure its in “Charge Only” mode
- Open and extract the ‘(doomlord_v4_root-zergrush-busybox-su.zip’ file and click “Runme.bat”
- Once done devices restart , at pc click on Start---search programs files---cmd, taip on (Program Files (x86)\Android\android-sdk\platform-tools>adb shell) like picture below

- Devices will pop up superuser remember click allow.
- on pc screen when showing "#" icon mean congratulation you have bean success permanent root.
Now second step pretends S-OFF
- Download FARDJADB (Runnymede S-OFF) special thanks to FARDJADB
- After download should get FARDJADB_Runnymede_0.1.exe , just plug in cable click on FARDJADB_Runnymede_0.1.exe . wait until finish process you will get S-OFF as picture below.

3.Done your devices was security off success ( You won't get Radio S-OFF with flashing this HBOOT. Having this said, even if you enable writeCID function in HBOOT you can't change the CID).
4.download Htc Runnymede Official ICS firmware ,(this is malaysia firmware if you need other country can be search at web) .
5.for those having problems with CID, here is a workaround:
First thing you need to do is to extract the rom.zip file from the RUU. here is a quick how-to however:
Open the RUU.
After Welcome screen shown up, open %temp% in explorer (ie. Meta/Win-Key + R, type %temp% and press enter)
Sort items by Date modified and open the most recent modified folder having a GUID name (ie. something like {3F99782F-1E57-40F2-9F33-D48C3DC171C5})
Search for rom.zip and move/copy it to somewhere else.
Close the RUU.
Now download SigTool and place it beside the rom.zip file. Open Command-Prompt, cd to the right directory and execute the following:
Code:
SigTool rip rom.zip
the expected output is:
Code:
Creating backup...
Ripping signature...
Done.
Go ahead and extract the signature-ripped rom.zip file.
Open android-info.txt in a *nix end of line aware text editor (ex. Notepad++). You should see something like this:
Code:
modelid: PI3920000
cidnum: HTC__001
cidnum: HTC__E11
cidnum: HTC__203
cidnum: HTC__102
cidnum: HTC__405
cidnum: HTC__Y13
cidnum: HTC__A07
cidnum: HTC__304
cidnum: HTC__032
cidnum: HTC__J15
cidnum: HTC__016
mainver: 1.05.111.8
hbootpreupdate:12
Add your phone CID
If you don't know your CID you can get it this way:
While your phone is in bootloader and connected in FASTBOOT-USB mode, execute this:
Code:
fastboot getvar cid
it should output something like cid: T-MOB101
then add a new line (cidnum: <YOURCIDNUM>) below the modelid in android-info.txt so it looks like:
HTML Code:
modelid: PI3920000
cidnum: T-MOB101
...
Save changes and close the editor.
This is important:
In extracted contents you should see a file with hboot name prefix, exclude/take it away and repack other files. I assume you choose rom-new.zip for the archive name.
Now you should null sign (that's how I like to call it) the file:
Code:
SigTool nullsign rom-new.zip
and flash the null-signed rom zip file:
Code:
fastboot flash zip rom-new.zip
when finished, flash the 1.28 hboot you moved away before:
Code:
fastboot flash hboot hboot_*.nb0
Reboot your device.
p/s: i am copy this post from (
fardjad) really thanks to him,i am success my work upgrading devices from other country to my country firmware). and this was my reference to keep it.
Monday 11 June 2012
DELL STREAK ROM FIX FAIL UPGRADE
DELL STREAK ROM FIX FAIL UPGRADE
Official rom version (Android 2.2.2) (CHECK ABOUT AT YOUR DEVICES)
.Baseband version=GAUSB1A134700-EU
.OEM version=GAUSB1A134700
.Build number 15274
.Kernel version 2.6.32.9-pert
What you need
1.When the device stuck at Dell Logo after OTA upgrade,remove battery and put it back, press and hold POWER button and Camera button.

wait until the screen show as picture below
 (touch the FASTBOOT on screen to boot into fastboot mode)
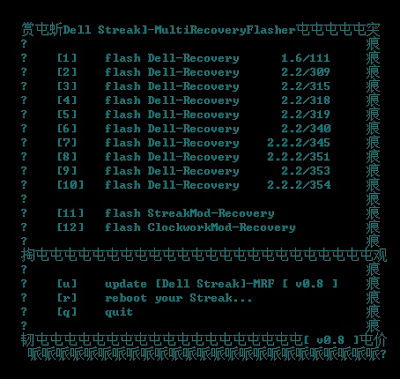
2 .Open MultiRecoveryFlasher.v0.8 folder click on MultiRecoveryFlasher.bat

3.Wait until your computer screen show as picture below
 4.Copy Streak_318_12821_00.pkg to Memory Card and rename the file to update.pkg make sure microSD was formatted with fat32 before copy the rom.
5.Press power button when dell logo launch press and hold volume up and down button to boot up recovery.
 (Select No 2 and press camera button key to upgrade firmware from microSD)
6.Wait until installation finish will auto reboot.

7.After reboot follow back step No 1 remove battery and put it back, press and hold POWER button and Camera button to boot fastboot for prepare to flash Baseband318.
8.Open MultiBasebandFlasher.V0.1 folder click on MultiBasebandFlasher.bat then key b318 to flash new version on baseband.
 9.Wait until finish key in R at select mode to restart your devices.
10.DONE
Official rom version (Android 2.2.2) (CHECK ABOUT AT YOUR DEVICES)
.Baseband version=GAUSB1A134700-EU
.OEM version=GAUSB1A134700
.Build number 15274
.Kernel version 2.6.32.9-pert
What you need
- StreakMod-Recovery (3rd party recovery,to backup,restore and flashing 3rd party custom rom)
- Baseband318 (is official version BASEBAND VERSION after flash will be GAUSB1A135100-EU)
- Dell-Recovery318 (official version RECOVERY after flash will be GAUSB1A135100 )
- InstallDellMSync.exe (dell ADB driver for recovery mode)
- ADB_Tethering_Driver (dell ADB driver for recovery mode)
- Streak_318_12821_00 (dell official new version rom)
1.When the device stuck at Dell Logo after OTA upgrade,remove battery and put it back, press and hold POWER button and Camera button.

wait until the screen show as picture below

2 .Open MultiRecoveryFlasher.v0.8 folder click on MultiRecoveryFlasher.bat

3.Wait until your computer screen show as picture below

5.Press power button when dell logo launch press and hold volume up and down button to boot up recovery.

6.Wait until installation finish will auto reboot.

7.After reboot follow back step No 1 remove battery and put it back, press and hold POWER button and Camera button to boot fastboot for prepare to flash Baseband318.
8.Open MultiBasebandFlasher.V0.1 folder click on MultiBasebandFlasher.bat then key b318 to flash new version on baseband.

10.DONE
SUPER USER(ROOT) HTC Sensation ICS(4.0.3) with HBOOT 1.27.0000
SUPER
USER(ROOT) HTC Sensation ICS(4.0.3) with HBOOT 1.27.0000
DISCLAIMER: i won’t be responsible if this
process bricks your device
1.
Make sure your device battery is fully charged
2.
Make sure you have GOLD CARD
3.
Go to SETTINGS\DEVELOP OPTION
4.
Make sure USB DEBUGGING is TICK
5.
Shut down the device & take out the battery
& put it back to device
6.
Long press POWER BUTTON & VOLUME DOWN BUTTON
until you see the white screen similar like below.

7.Make sure is ***LOCKED***
8.Make sure is PYRAMID PVT SHIP S-ON RL
9.Make sure is HBOOT-1.2.7.0000
10.Prepare one empty memory card and plug to your device
11.Go to WWW.HTC.COM download the latest HTC sync
12.Download TEMPROOT ZIP
13.Extract temproot-sensation-windows.zip into a directory on your computer.
14.Plug your HTC SENSATION/XE into your computer via USB.
15.Double click temp_root.bat to run the script and wait until it completes. Don't touch the device during the entire process.
16.After
done,your device will automatic reboot into Android OS main screen
without any ICON.JUST LEAVE IT,DON’T EVER TOUCH YOUR DEVICE SCREEN.
17.Download the Control Bear unlock tool
18.Extract and double click ControlBear.exe

20.Notice your computer screen
Do not remove sdcard from phone
Do wire-trick now!! Look instructions at web
Do not remove sdcard from phone
Do wire-trick now!! Look instructions at web
Do not remove sdcard from phone
Do wire-trick now!! Look instructions at web
Waiting device....
21. Use a paper clip to contact the connection
(contact and release one second and contact and release at all)

If done incorrectly (as in
the timing is wrong) you will get this message.
Do not remove sdcard from phone
Do wire-trick now!! Look instructions at web
Waiting device....
Found device... Please wait...
Getting into bar.....
Raising Glass
SUCCESS - Taking a sip.
SUCCESS - Beer is tasty.
SUCCESS - Beer is tasty.
SUCCESS - Beer is tasty.
SUCCESS - Beer is tasty.
SUCCESS - Buddies and Beer
Checking alcohol level......
Let's take one more......
Errorcode: 66732337
ErrorMsg: Still sober
Quit....
Press ENTER to exit.....
If so, please
close Control Bear.exe and reopen it and it will start again.
(Please refer
to below youtube link to watch the tutorial)
Once it's done successfully, you will
see this message...
======== ControlBear version 0.2 for JuopunutBear S-OFF ==========
Starting up......
Making room for beer......
Loading sixpacks on sdcard......
Loaded......
Do not remove sdcard from phone
Do wire-trick now!! Look instructions at web
Waiting device....
Rebooting device
Please wait....
Found device... Please wait...
Getting into bar.....
Raising Glass
SUCCESS - Taking a sip.
SUCCESS - Beer is tasty.
SUCCESS - Beer is tasty.
SUCCESS - Beer is tasty.
SUCCESS - Beer is tasty.
SUCCESS - Buddies and Beer
Checking alcohol level......
Seems to be just right.....
Let's take one more......
Aaaah, nice sunny day!!
Rebooting.......
Waiting device....
Found device... Please wait...
Rebooting bootloader.......
Waiting device....
Fastboot detected
JuopunutBear S-OFF success
Do you want to install JuopunutBear modified hboot? (y/n)
Installing JuopunutBear hboot.....
Waiting.....
Flashing.......
Rebooting......
JuopunutBear hboot installed
Press ENTER to exit.....
Now, that's it
and you are done. It will reboot into Bootloader and you will see this:

22.
once control Bear is over..don't do anything to the device and let it
be connected--and if the device is left in bootloader---reboot manually
using power and vol up/down
23. now you guys need to remove the temp root which you have created first
to do that Double click temp_root_remove.bat to run the script and wait until it completes. Don't touch the device during the entire process.After done, Your device will boot into Android OS normal mode.
24.Plug the usb cable to your device and boot into HBOOT and select FASTBOOT(follow step 4 & step 5)
25.Press window icon key in your PC and taip CMD and press enter key

26.DRAP “ temproot-sensation-windows” folder and DROP to CMD.exe and press enter key

27.Taip the
command as below;
fastboot oem writecid 11111111 (to change CID)
fastboot reboot-bootloader (bootloader will reboot)
fastboot getvar cid (it will confirm your CID as 11111111
fastboot reboot (to reboot back to Android OS)
28.Download CWM Recovery V5.0.0.8
29.Extract and put PG58IMG.zip into memory card.
30.Download Superuser-3.0.7
31. Extract and put Superuser-3.0.7.zip into memory card and plug into your device.
32.Boot into HBOOT(follow step 4 & step 5)
29.Extract and put PG58IMG.zip into memory card.
30.Download Superuser-3.0.7
31. Extract and put Superuser-3.0.7.zip into memory card and plug into your device.
32.Boot into HBOOT(follow step 4 & step 5)

33.Press VOL UP to
start update

34.After done,press VOL DOWN to choose RECOVERY and press POWER BUTTON to enter.
35.In CWM Recovery Mode,press VOL DOWN to choosing and press
POWER BUTTON to enter
--install zip from sdcard
--choose zip from sdcard
--superuser-3.0.7.zip

36.After
install superuser-3.0.7.zip,back to main menu and choose reboot system now.
37.Congratulation,your HTC Sensation/XE haven been ROOT.
P/S: Info Job special thanks for Kevin Lee.
Subscribe to:
Posts (Atom)